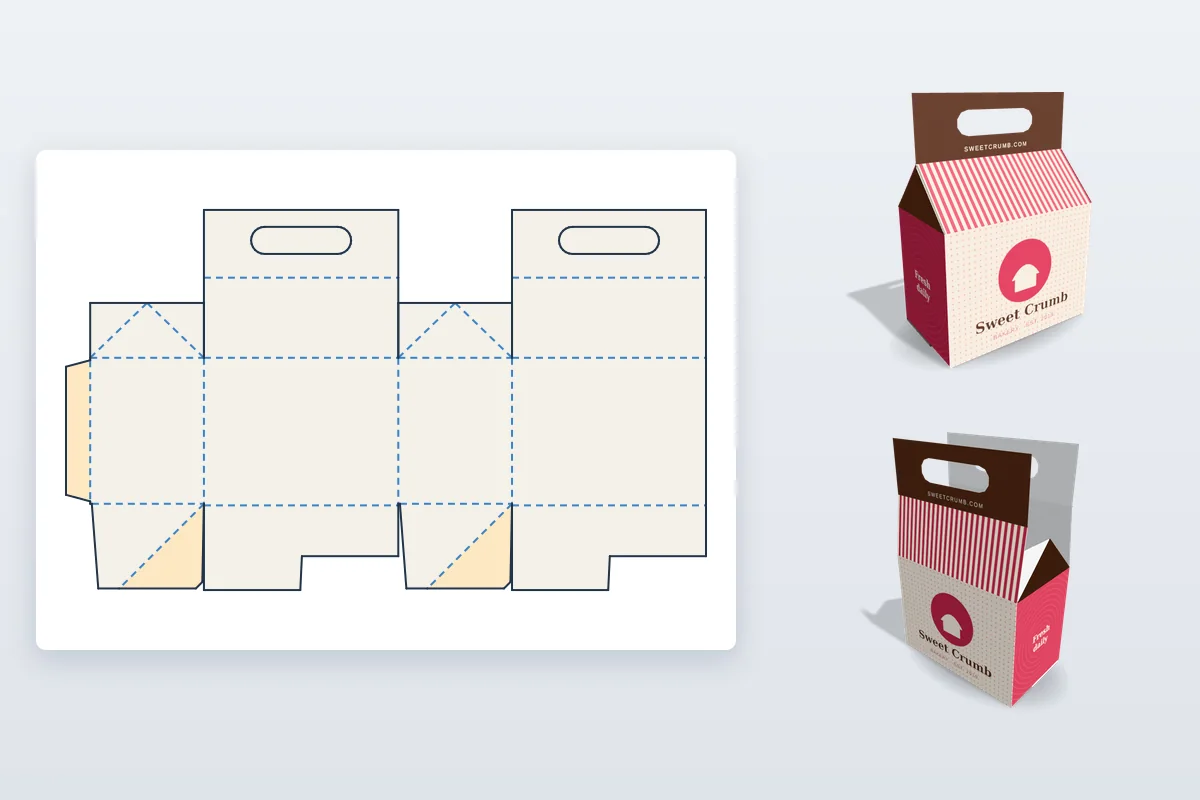
A gable box is the carton with a pitched roof and a handle that bakeries, takeaways and party shops love. It carries easily, ships flat until it is needed, and the tall roof and handle give a lot of room for branding. The clever part is how the ends close: the roof panels lean in over triangular gable ends, with small gusset flaps folded in under the roof.
This guide explains how a gable box works, how to choose its size, and how to make the dieline in your own size with the free gable box template, then design it and watch it fold closed in 3D.
How a gable box works
The whole box is one piece of board: a glue flap and four walls in a row, with the roof, handles and gable ends above them and the bottom flaps below.
- The glue flap is stuck inside the back wall, which turns the sheet into a tube that folds flat for shipping.
- The bottom is an auto-lock (crash-lock) bottom: its side flaps have glue tabs stuck to the front and back flaps, so when the flat box is opened the bottom swings down and locks itself. See how a crash lock bottom works.
- Above each side wall is a triangular gable end with a small gusset flap on each slope. The gussets fold in, under where the roof will come down.
- The roof panels above the front and back walls lean in over the gable ends until they meet in the middle. Each roof ends in a handle panel, so the two handles stand back to back, and their finger holes line up for carrying.
Choosing the size
- Width: the inside of the front and back walls, from side to side.
- Depth: the inside of the side walls, from front to back. The roof slopes across the depth, so a deeper box has a longer roof.
- Height: the inside of the body, from the bottom to where the roof begins. The roof adds space above that.
- Roof height: by default about half the depth. Raise it for cupcakes or anything that sticks up above the walls, lower it for a flatter look.
- Handle height: at least 30 mm so a finger fits through the hole. A taller handle gives more room for a logo or a web address.
As a starting point: two to four cupcakes fit a box about 180 × 90 × 90 mm, a party favour 100 × 70 × 60 mm and a kids' meal 160 × 100 × 100 mm. The template page has these as presets.
Make the gable box dieline in your size
- Open the gable box template and pick a preset or type the width, height and depth in millimetres or inches. The dieline redraws as you type.
- Open it in the Studio and set the board thickness. Under Box & Size you can also set the roof height, the handle height, the glue flap and the bottom side flaps.
- Place artwork on the walls, the roof panels, the handles and the gable ends. The roof and handles are the first thing people see when the box is carried, so they are a good place for the logo.
- Fold it in 3D to check the design on the closed box, then export a 1:1 PDF, or the cutting template as SVG or DXF.
Folding it by hand
- Cut along the solid lines, including the finger holes and the short cuts that free each gusset from the roof beside it, and score the dashed lines.
- Glue the triangular tabs on the bottom side flaps to the front and back flaps beside them, then glue the glue flap inside the back wall. Fold the box flat and let it dry.
- Open the tube and push the bottom down until it locks.
- Fill the box, fold the gussets in, bring the two roof panels together over the middle and put the handles back to back.
Designing for a gable box
- Put the main logo on the front wall or the front roof: these face the customer on a counter or a shelf.
- Repeat the logo or a web address on both handles. They stand back to back, so each side of the carried box shows one.
- Keep text and logos clear of the finger hole, and a few millimetres away from the creases between the wall, roof and handle.
- The gable ends are triangles under the roof: give them a solid colour or a simple pattern rather than text.
- Leave the glue flap and the bottom's glue tabs free of ink and varnish so the glue holds.
Before production
The template is drawn from your size and board thickness, which is what you need for design, proofs, samples and quotes. For a production run, especially for food, send your printer the size and the cutting template, ask them to confirm the board, the crease allowances and the glue tabs, and check whether the board needs a food-safe or grease-resistant coating.
What is a gable box?
A carton with a pitched roof like a house and a carry handle on top. The front and back walls rise into roof panels that meet over the middle, each ending in a handle panel with a finger hole, and the sides rise into triangular gable ends.
Is there a free gable box template?
Yes. The gable box template in 3D Box Studio is free. Enter the width, depth and height of the body and it draws the dieline with the roof, handles, gusseted gable ends and auto-lock bottom, and folds it closed in 3D. Designing and exporting need a free account.
What size should a gable box be?
Measure the product and add a few millimetres of room. Width, depth and height are the inside of the body below the roof; the roof adds space above it, about half the depth by default, and the handle sits on top. Both can be changed in the Studio.
What board is best for gable boxes?
Folding carton board around 0.4 to 0.6 mm thick for light products such as favours and cupcakes, and thicker or food-safe coated board for heavier or greasy contents. The handle carries the whole load, so choose a stronger board if the box will be heavy.
Can I download the gable box dieline?
Yes. Export a 1:1 PDF with your artwork, bleed and cut and crease lines, or the cutting template on its own as SVG or DXF for a die maker, cutting table, Cricut or laser cutter. The finger holes are included as cut lines.